This is not strictly a particle effect tip, but particles are involved in a way.
I will simply outline the steps involved in creating a shatter effect using Peter Shipkov's most excellent
SOuP plugin suite for Maya. I recommend all Maya users to install SOuP and learn how to use it. I am also referring to
Jostein Finnekasa's excellent tutorial on Vimeo.
The purpose of this post is simply to write down all the steps that have already been outlined by Peter and Jostein, so that I can remember them!
Here are my notes on how to set up the shatter effect:
1. Drag any poly object's shape node from the Outliner to the Hypershade
2. Create a Scatter node from the SOuP shelf
3. Create a Shatter node from the SOuP shelf
4. Connect:
polyShape.worldMesh -> scatterShape.inGeometry
polyShape.worldMatrix -> scatterShape.inWorldMesh5. Connect:
scatterShape.outPositionPP -> shatter.inPositionPP
scatterShape.outGeometry -> shatter.inGeometry6. Make a copy of the poly object, set its scale to (1,1,1), drag its shape node into the Hypershade
7. Connect:
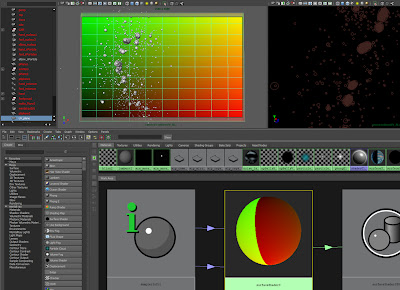
shatter.outGeometry -> polyShape2.inMeshYou should have a network like this one:

Now, you will notice that my horse is shattered but yours is not, that is because I checked Auto Evaluate on the Shatter node which is disabled by default. This is because the shattering process can take a long time to calculate depending on the number of points generated by the Scatter node. I suggest lowering the Max Number of Points on the Scatter node to 10 before checking the Auto Evaluate on the Shatter node so you can check that everything is connected up and working correctly.
So, you have a shattered poly, but there are no dynamics. The method that I have used to add dynamics is to make the shattered geometry a nCloth object. Here are my notes taken from Jostein Finnekasa's
Vimeo tutorial which explains everything very clearly.
1. Check Auto Evaluate on the Shatter node
2. Click the Bake Result on the shatter node when you are happy with your shatter results.
3. Apply a shader to the bakedResult
4. Create nCloth with the bakedResult selected
This will give you a nCloth object to which ou can apply all the usual forces and collisions. The workflow goes on to create dynamic contraints, nComponents and SOuP's Attribute Transfer node with Bounding Boxes to override the constraints. Here are my notes:
1. Select all vertices of the nCloth object
2. create a Transform nContsraint
3. Making the constraint created a Dynamic Constraint node. Drag this node from the outliner to the Hypershade
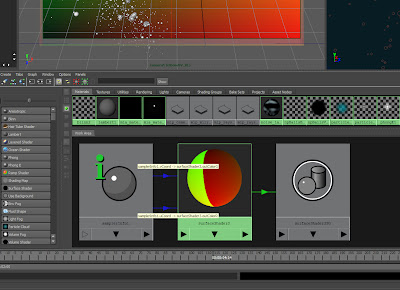
4. If you select and graph the bakedResult and the Dynamic Constraint nodes. You should see a graph like this one:

Here is the method for setting up the Attribute Transfer on the nCloth constraint:
1. Create an Attribute Transfer node
2. Check the Weight box on the Attribute Transfer node
3. In the Attribute Transfer node, create two Bounding Box objects.
4. Set the first Bounding Box to a cube and scale it so that it completely envelopes the poly object.
5. Set the first Bounding Box's Weight Falloff to a flat ramp with value 1
6. Set the second Bounding Box shape to a sphere
7. Set the second Bounding Box's Weight Falloff to a flat ramp with value -1
8. Connect:
bakedResultShape.worldMesh -> attributeTransfer.inGeometry
9. Connect:
attributeTransfer.outWeight -> nComponent.strengthPerVertex
attributeTransfer.outWeight -> nComponent.glueStrengthPerVertex
attributeTransfer.outWeight -> nComponent.weightPerVertex
10. Set nComponent Map Types to per vertex for all three maps
11. In the Dynamic Constraint node, set the Strength to 1, the Glue Strength to 0.1 and Glue Strength Scale to 0.1. These values are just starting points to control the way the nCloth acts, but they give good results for the tests I have done.
So, that is the setup done, you should have a network like this one:

Please go to the SOuP website and get the plugin. It's free, it's very powerful and there is loads of help, examples, tutorials. Also, the developer, Peter, seems to read all the forum posts and will reply to questions.
I will attempt to post more walk-throughs for SOuP as I learn them and use them in a production.
Here is a little shatter effect I created using SOuP ( and a couple of regular particle objects with instanced shard objects).